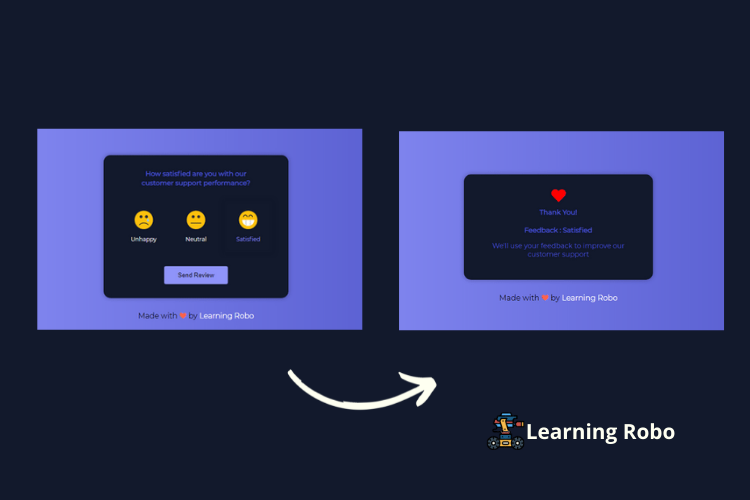
Rating is a feedback collection technique. The user has to select emoji as per their wish to share their feedback instead of filling a form. Feedback is usually collected by the company from the user or customer so that the company can improve customer support.
In this blog (Modern Feedback Form), as you see on the image, three emojis are named relevant to the emoji reaction respectively. The emojis are named as unhappy, neutral, and satisfied. The user has to click the emoji relevant to the question which is at the top of the emojis. There is a button called Send Review at the bottom of the emojis. After selecting the relevant emoji, the user has to click on the send review button to send the feedback.
After clicking on the send review button, the user will see a card with the thank you message along with their feedback and some content below it. JavaScript code is used to select the emoji and to display thank you for a message with the feedback that the user selected.
The source code of this Modern Feedback Form using HTML, CSS & JavaScript is given below, if you want the source code of this program, you can copy it. You can use this Modern Feedback Form code with your creativity and can take this form to the next level.
Modern Feedback Form using HTML, CSS & JavaScript [Source Code]
To make this website, you have to make three files: an HTML file, a CSS file & a JavaScript file. First, create an HTML file with the name of index.html and remember, you have to create a file with a .html extension.
@import url('https://fonts.googleapis.com/css?family=Montserrat&display=swap');

* {
  box-sizing: border-box;
}

body {
    background: #4e54c8;
    background: -webkit-linear-gradient(to right, #8f94fb, #4e54c8);
    background: linear-gradient(to right, #8f94fb, #4e54c8);
  font-family: 'Montserrat', sans-serif;
  overflow: hidden;
  height:100vh;
}

.panel-container {
  background-color: #12192c;
  box-shadow: 0 0 10px rgba(0, 0, 0, 0.3);
  border-radius: 15px;
  font-size: 90%;
  display: flex;
  flex-direction: column;
  justify-content: center;
  align-items: center;
  text-align: center;
  padding: 30px;
  max-width: 400px;
  color:#4e54c8;
  margin:10% auto 2% auto;
}

.panel-container strong {
  line-height: 20px;
}

.ratings-container {
  display: flex;
  margin: 20px 0;
}

.rating {
  flex: 1;
  cursor: pointer;
  padding: 20px;
  margin: 10px 5px;
}

.rating:hover,
.rating.active {
  border-radius: 4px;
  box-shadow: 0 0 10px rgba(0, 0, 0, 0.1);
}

.rating img {
  width: 40px;
}

.rating small {
  color: #fff;
  display: inline-block;
  margin: 10px 0 0;
}

.rating:hover small,
.rating.active small {
  color: #8f94fb;
}

.btn {
  background-color: #8f94fb;
  color: #000;
  border: 0;
  border-radius: 4px;
  padding: 12px 30px;
  cursor: pointer;
}

.btn:focus {
  outline: 0;
}

.btn:active {
  transform: scale(0.98);
}

.fa-heart {
  color: red;
  font-size: 30px;
  margin-bottom: 10px;
}


.credit a{
    text-decoration: none;
    color: #fff;
  }

  .credit {
      text-align: center;
  }
const ratings = document.querySelectorAll('.rating')
const ratingsContainer = document.querySelector('.ratings-container')
const sendBtn = document.querySelector('#send')
const panel = document.querySelector('#panel')
let selectedRating = 'Satisfied'

ratingsContainer.addEventListener('click', (e) => {
    if(e.target.parentNode.classList.contains('rating')) {
        removeActive()
        e.target.parentNode.classList.add('active')
        selectedRating = e.target.nextElementSibling.innerHTML
    }
    if(e.target.classList.contains('rating')) {
        removeActive()
        e.target.classList.add('active')
        selectedRating = e.target.nextElementSibling.innerHTML
    }

})

sendBtn.addEventListener('click', (e) => {
    panel.innerHTML = `

        Thank You!


        Feedback : ${selectedRating}
        We'll use your feedback to improve our customer support
    `
})

function removeActive() {
    for(let i = 0; i < ratings.length; i++) {
        ratings[i].classList.remove('active')
    }
}
Thank you for reading our blog. If you face any problem in creating this Modern Feedback Form using HTML, CSS & JavaScript then contact us or comment us. We’ll try to provide a solution to your problem as soon as possible.


Post a Comment
Thank you
Learning robo team